Skyrim:Arkngthamz
|
|||
|---|---|---|---|
| Added by | Dawnguard | ||
| # of Zones | 1 | ||
| Clearable | Yes (see bugs) | ||
| Dungeon | Yes | ||
| Respawn Time | Never (storage is safe) | ||
| Level | Min: 16 | ||
| Occupants | |||
| Dwarven Automatons, Falmer, Chaurus | |||
| Important Treasure | |||
| Aetherium Shard Zephyr |
|||
| Console Location Code(s) | |||
| DLC1ArkngthamzExterior01, DLC1ArkngthamzExterior02, DLC1Arkngthamz01 | |||
| Region | |||
| Falkreath Hold (see bugs) | |||
| Location | |||
| Southeast of Dushnikh Yal West of Valthume |
|||
| Ore Veins | |||
| # of Ebony | 2 | ||
| # of Quicksilver | 1 | ||
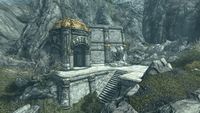
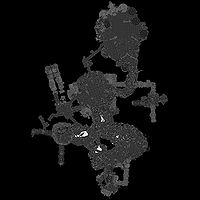
Arkngthamz is a small Dwarven ruin southeast of Dushnikh Yal containing Dwarven automatons, Falmer, and chaurus. It contains only one zone, Arkngthamz.
A map marker for the location will be added by reading the book The Aetherium Wars, giving you a miscellaneous objective to investigate the ruins. Copies of this book can be found in several places, but the copy on the adventurer's body near the entrance to Mzulft is a quest item which will make additional copies of the book be treated as quest items until you read the journal found in Arkngthamz. The copy on the body of the conjurer adventurer near Deep Folk Crossing may also be a quest item.
Related Quests[edit]
- Lost to the Ages: Search for the Dwemer's Aetherium Forge.
Walkthrough[edit]
Exterior[edit]
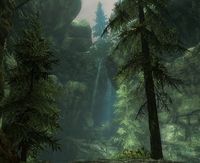
There is a path heading east from the Orc stronghold of Dushnikh Yal that passes Arkngthamz. Several wild animals can be found in the region, including one that is usually very near to the entrance. Many juniper trees grow throughout the surrounding area. You may notice the ground shaking when nearing the ruins. These tremors continue inside the ruins as well. As noted by Katria, some of the dangers present in Arkngthamz include major earthquakes, massive chasms, and unstable ground. The ruins have suffered greatly from these.
Arkngthamz[edit]
The entrance leads directly into a passage heading north. As you proceed, you will hear Katria telling you to turn back. At the end, a fallen pillar provides a ramp down into a narrow chamber with a stream fed by a waterfall on your right flowing through it. Beneath the pillar, you'll find the remains of a Dwarven spider, and the first of many glowing mushrooms found throughout these ruins. At the bottom of the pillar, a large doorway leads into a passage that turns east after a few more paces. There are several pillars along this passage that have been damaged by earthquakes, making the floor uneven with rubble, among which are the remains of a Dwarven sphere. As you follow this passage, you will again hear Katria warning you to turn back.
The passage opens into a huge open-roofed chamber with large ledges split by a fast-moving river below. The opposite ledge is above the level of the near ledge, and has some Falmer fencing along part of the edge. This side is fairly empty and open, with stairs to your right leading up to a platform with the remains of another Dwarven spider at the far end. From the edge of the open area, you can see some masonry where possibly a bridge has fallen. The only way forward is a stone pillar that has fallen and is leaning against this edge, leading down to the top of an earthen column with a dead body on top. There is a large waterfall to the left, and the water runs under the wall to the right. The dead body turns out to be Katria, who died in a fall from a ledge far above, and whose ghost appears next to you shortly after you first enter these ruins. As you approach her body, Katria will tell you to retrieve her journal from her corpse. The journal provides more info regarding the site, the forge, and other important sites, and at the back, a few hints regarding a tonal lock. Once you read the journal, copies of The Aetherium Wars are no longer classed as quest items, and thus can be dropped and weigh the same as normal books. From here, you can follow a broken pipe down to the water. The current flows northwest to a ledge which contains the remains of a Dwarven spider and sphere. On the west side of the water, a ramp heads south past the body of a dead Falmer up to a dead end with an unlocked Dwarven chest. Returning to Katria's body, cross another pipe to a small tunnel. Lying at the end of the small tunnel is another dead Falmer, while beneath the grating used as flooring is a small space you can drop down into to find two Dwarven metal ingots and a centurion dynamo core. Walk back up the pipe and follow the small tunnel past the dead Falmer, where two leveled Dwarven spiders will drop from a Dwarven scuttle and attack. At the far end is a completely flooded room with pipes above. The remains of another Dwarven sphere are directly ahead. Under the water in the northeastern corner is an unlocked Dwarven chest. A pipe can be climbed and followed up and around to a passage in the northwestern corner. Any followers, including Katria, may be reluctant to make the short drop to the area beyond the fence at the end of the pipe. However, the "wait" command can resolve this for most followers, while the next time Katria speaks, she will reappear beside you regardless.
At the end of the passage is a metal gate that keeps opening and closing as a tonal lock keeps rising and falling. Around the corner is a second tonal lock by a closed gate. You can activate a tonal lock by casting a ranged spell or hitting it with a melee or ranged weapon. Strike the second tonal lock to open the second gate. Striking the first tonal lock will cause it to stop falling, which will stop the gate from closing and end the clanging noise. Beyond the gate is a flight of stairs leading up to a passage that is off-kilter. Around a corner is another flight of stairs, with a Falmer patrolling the area. As you continue, if Katria is with you, she may warn you about Falmer before they can see you. The stairs lead up to the far side of the huge chamber split by the fast-flowing river. You come out at the top of stairs leading down. There is a second Falmer patrolling across the top of the stairs, and a Falmer tent to the right containing an unlocked Falmer chest. Another leveled Falmer can be seen wandering to the left of the tent, overlooking the drop below. There are the bodies of two further dead Falmer in this area that can be looted. Following the front edge back to the north, at the far end of a narrow ledge is an unlocked Dwarven chest.
There is a path heading up past the tent to the south before crossing over the river to the east then following the wall farther to the south. There are several glowing mushrooms found growing on the walls, and the occasional Falmer hive with Falmer that drop from them as you approach. After the first set of hives, a bridge formed by another stone pillar crosses to the north. South of the bridge is a closed Dwarven metal gate; as you approach, Katria will exclaim "Look, there's a chest in there. Door's sealed tight, though...". The gate cannot be opened from this side. Instead of crossing the bridge, if you walk to the end of the ledge on this side and look below, you will see a couple of ledges that step down to a ramp leading up from the water. Either jump into the water or use the ledges to drop to a tunnel with water streaming out of it below. Entering this tunnel leads to an area with a lot of vegetation, including several hanging moss growing off the edge of an earthen ramp that leads up and around to where the water exits under the rock. At the end of the stream are the remains of a Dwarven centurion, and to the right up the ramp by a broken pipe are those of a Dwarven spider. At the top of the ramp is a Dwarven scuttle, from which emerges a leveled Dwarven sphere. Once the sphere is dispatched, keep climbing the ramp to the unlocked Dwarven chest Katria originally saw behind the closed gate. A lever that opens the gate is to the right of the gate. Note it's best to instruct followers to wait before dropping down. Also, when opening the gate, Katria can get stuck; closing and reopening the gate resolves this.
Now cross the bridge to the north; the path on the far side continues left and right. To the right is another Falmer hive containing a Falmer, unless you've already faced it, and shortly after a dead end. To the left the path continues to climb before again crossing the chamber and the water below. On the far side is another leveled Falmer and possibly a chaurus. The path then turns a corner and splits, with the left-hand side continuing up, and the right-hand side descending; under the path that descends is an unlocked Falmer chest. The chamber is tall, circular, and flooded with deep water. Under the water to the west is a small submerged tunnel that leads to a hidden chamber containing an unlocked wooden chest, a random one-handed weapon and shield, two coin purses (one large and one small), a total of twelve loose coins, and a lootable skeleton.
Following the left-hand path and continuing to climb, the path soon crosses the chamber one final time before entering a tunnel heading northeast, with many glowing mushrooms by the mouth of the tunnel. After a short distance, the passage turns to the northwest, then enters another chamber containing a Falmer tent and two Falmer hives. There is a chaurus or chaurus hunter in front of you, and a leveled Falmer at the top of a ramp, off to the right. Inside the tent is an unlocked Falmer chest. In the rear corner of the room is a pen containing another chaurus or chaurus hunter, and in front of the pen a Falmer gated tunnel heading southwest. There are a few chaurus egg sacs along this tunnel, which leads to another chamber containing two more chaurus or chaurus hunters and several more egg sacs. A ramp at the rear of this chamber leads to another tunnel, with water rushing along it before pouring out as a waterfall at the end into the chamber with the deep water previously passed. There is a small ledge to the left of the waterfall with an unlocked Falmer chest on it, and a Falmer hive above containing a Falmer that drops down and attacks. There is another ledge below to the right which you can jump down to (you may suffer minor damage), and from there another tunnel with a waterfall coming out of it to the right. At the far end of this tunnel is a veil of water, behind which is another unlocked Falmer chest. From this tunnel, your only option is to drop to the deep water below and retrace your steps back up to the chamber containing the Falmer tent and chaurus, then follow the ascending ramp at the back.
Climbing the ramp leads to a tunnel heading northeast to the huge open-roofed chamber, far above where you originally entered it. There are trees and vegetation all around, but no further Falmer, chaurus, or automations (except those released for incorrect puzzle attempts). As you enter, Katria will comment "Here's where I fell. Feels like ages ago." and then exclaim "Hey, there's my bow! There, out on the log. Wondered what happened to it." Hanging off the end of a large tree trunk hanging over the edge of the ledge opposite is her unique bow Zephyr, which fires 30% faster than standard bows. Once you retrieve it, Katria asks you to "Take good care of it for me." There is an earthen ramp at the rear of the chamber, which leads to another ramp that continues to climb before reaching a stone square arch. Beyond the arch is a ledge that descends into the final chamber.
As you approach the first stone arch in this room, if you look to your left, you will see another stone arch on a lower level with a lootable skeleton, a large coin purse, and an iron sword on top of it; you can jump to this arch and collect the loot. Under the skeleton is also an iron shield. Before this, on a ledge that you can drop to below the entrance to this chamber is an ebony ore vein; the ledge can more easily be seen from the roof of the building in the wall to your left as you enter. Continuing down the ramp to the other end of the chamber, there is another ledge with a quicksilver ore vein that you can drop to. A careful jump along the wall just past this ore vein will allow you to reach another small ledge with a Dwarven chest, but you cannot interact with it. There is another ebony ore vein near the quicksilver vein, which you can reach from the floor of the chamber. This room has many Falmer hives on the walls, but they seem to contain no Falmer. There are a total of five skeletons in the room in the area near the tonal lock puzzle, four of which can be looted for a few coins, the remains of a Dwarven sphere, and the body of a dead adventurer, with many Dwarven arrows piercing the corpse and on the ground nearby. The dead adventurer is carrying a scrap of paper that provides more clues to the correct order for the tonal locks; these supplement the clues contained in Katria's journal. There is a stone square arch leaning over nearby, with the fifth skeleton pierced by a huge ballista bolt (the bones may have fallen in a heap, and in any case can not be interacted with). Using the nearby earthen ramp and column, it is possible to jump atop the leaning arch, and from there reach a ledge behind a vertical brass pipe against the wall; another unlocked Dwarven chest is behind this pipe.
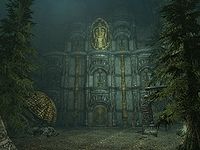
To get to the treasures, including the Aetherium Shard, you must strike the five kinetic resonators in the correct order with ranged attacks to trigger the tonal locks. If you hit the resonators in the wrong order, the ports on the front of the structure will release four Dwarven spiders the first time, two Dwarven spheres the second time, and a Dwarven centurion (which emerges from its dock hidden behind the middle gate) the third or fourth time. After the Dwarven centurion, there will be no more enemies released for incorrect attempts, but the Dwemer ballista at the top of the structure will briefly rain down bolts after each wrong answer that does not release an enemy. You can avoid the bolts by hugging the structure. The correct answer is: lower left, lower right, upper left, upper right, lower middle. This will open both outer gates. Once the outer gates have been opened, you cannot get the Dwarven automatons released.
Follow the tunnel through either door, and you will see the Aetherium Shard. There is a Dwarven boss chest behind the shard and two further Dwarven chests, one each on the walls to either side. All three chests are unlocked. To either side of the shard are sets of shelves containing various Dwemer metal items, Dwarven metal ingots, and two centurion dynamo cores. After you collect the loot, head for the water in the west side of the chamber, and take the tunnel there for a shortcut back to a ledge in the main chamber. Save before taking the long drop to the water, though, as you or any followers could easily die if you or they hit the rocks at the end of the pool or another hard surface. Finally, backtrack to the entrance, and exit the ruins.
Bugs[edit]
- Although Arkngthamz is geographically located within the borders of the Reach, in the game data it is identified as being within Falkreath Hold.
-
The Unofficial Skyrim Patch, version 2.1.1, fixes this bug.
-
- Although the zone flag suggests the location is clearable, there is no boss defined and no call to
SetCleared().
Maps[edit]
- Skyrim-Places-Dwarven Ruins
- Skyrim-Places
- Skyrim-Places-Level 16
- Skyrim-Dawnguard
- Skyrim-Dawnguard-Places
- Skyrim-Places-Falmer Hives
- Skyrim-Places-Falkreath Hold
- Skyrim-Places-Ebony Veins
- Skyrim-Places-Quicksilver Veins
- Skyrim-Places-Clearable
- Skyrim-Places-Safe
- Skyrim-Places-Discoverable
- Skyrim-Bugs Fixed by the Unofficial Skyrim Patch
- Skyrim-Confirmed Bugs


