Oblivion:Mackamentain
|
|||
|---|---|---|---|
| # of Zones | 3 | ||
| # of Welkynd Stones | 5 | ||
| # of Varla Stones | 4 | ||
| Occupants | |||
| Necromancers, Zombie Undead (1 boss-level Necromancer) |
|||
| Important Treasure | |||
| 1 Ayleid Statue 1 boss-level Ayleid Reliquary |
|||
| Console Location Code(s) | |||
| MackamentainExterior, Mackamentain, Mackamentain02, Mackamentain03 | |||
| Region | |||
| Nibenay Basin | |||
| Location | |||
| Northern corner of small lake north of Silverfish River | |||
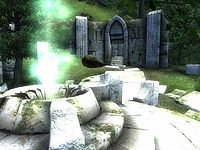
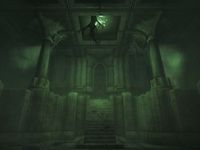
Mackamentain is a medium-sized Ayleid ruin northeast of Bravil containing necromancers (quest-related). It contains three zones: Mackamentain, Tombs of the Undead, and Necromancer's Asylum.
Related Quests[edit]
- The Collector: Help Umbacano, a collector of ancient artifacts, recover the "Ten Ancestors", a set of ancient Ayleid statues.
Notes[edit]
- There is an Ayleid Well right next to the entrance, which will supply you with some potentially useful extra Magicka.
- This ruin contains four valuable Varla Stones, all very close to the entrance.
- This ruin can be entered, fully explored and all items retrieved without starting the related quest. Selling the Ayleid Statue found in Mackamentain is one way to start the quest.
Exterior[edit]
- The exterior is located at coordinates: Tamriel 32, 1
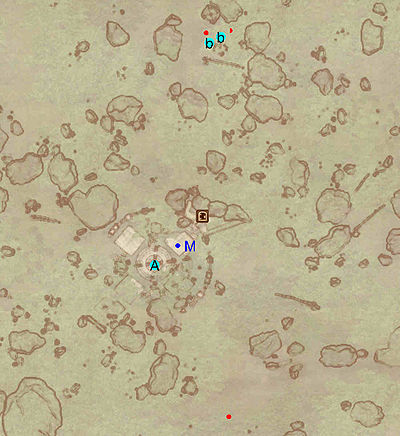
- This location's map marker (M on map) is named Mackamentain (editor name MackamentainMapMarker). The entrance door is NE of the marker, 40 feet away.
- 1-2 Campsite Bandits (each 50% probability melee Bandit, 25% archer Bandit, 12.5% Bandit Hedge Wizard, 12.5% dog) are near the entrance
- 1 Wilderness Creature (Valley variety) is near the entrance
- The following plants can be found near the entrance: 16 Bergamot plants, 3 Flax plants, 13 Lavender plants, and 29 Monkshood plants
- 1 Ayleid Well is at location A on map
- 2 bedrolls are at b
Zone 1: Mackamentain[edit]
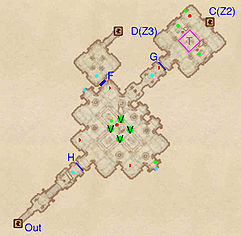
This level is pretty straightforward: except for enemies the only obstacle you will find is a Ceiling Spike trap at location T on the map, which can be easily detected and bypassed. You can even use the trap to your advantage while fighting the enemy in the last room.
In the first big chamber there are four valuable Varla Stones (V) which are protected by an enemy. The switches for the Varla cages are separate: an alcove on the southeast wall contains a Push Block (cyan dot) which opens the south and east Varla stone cages; an alcove on the northwest wall contains a Push Block which opens the other two. In the last room, be sure not to miss the Ayleid Chest which is hidden behind an altar against the northwest wall.
In the north corner of the first chamber is passageway behind a Hidden Door (F). Door F can only be opened from the north side of the door, by stepping on a stone block (cyan dot). You will reach this area when returning from the final zone through door D.
Exit the level to the second zone by using door C.
Occupants:
- 2-6 Necromancer Enemies (each 50% probability Necromancer, 50% Undead)
Treasure:
- 4 Varla Stones (all in Varla Stone Cages) at locations V on map, opened by the two switches (cyan dots) in the alcoves to the sides
- 2 Ayleid Casks 01 (1 locked)
- 1 Ayleid Cask 02
- 1 Chest 03
- 1 Restoration Ayleid Chest
Traps:
- 1 Ceiling Spikes trap at location T on map
Doors and Gates:
- There are three doors in/out of this zone
- 1 door (at Out) leads outside
- 1 door (at C) leads to the zone Tombs of the Undead
- 1 door (at D) leads to the zone Necromancer's Asylum
- 1 Hidden Door at F. Can only be opened from the north side of the door, by stepping on the stone block (cyan dot).
- 2 Iron Gates at G and H, each of which is opened by stepping on the stone block (cyan dot) in front of the gate.
Zone 2: Tombs of the Undead[edit]
You enter from the first zone through door C, and exit to the third zone through door E.
The start of this zone may be troublesome; if you just run in you may well be detected almost immediately by the first enemy, and fighting it will most likely also bring two others into the battle. You can avoid all of them by sneaking straight ahead and up the stairs (which is the only path to the end of the zone), although this will cause you to miss three minor treasure containers.
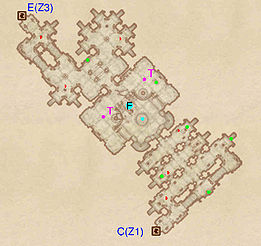
Continue along the raised corridor to enter a chamber where you will have to activate the Stone Steps at F with the pressure plate in front of it (cyan dot on the map). This chamber also contains two Gas Traps (T) which can be easily avoided to reach the chest in the right corner.
The next chamber holds little except up to three enemies which could attack you at once after you start fighting with one.
Occupants:
- 0-6 Necromancer Enemies (each 50% probability Necromancer, 50% Undead)
Treasure:
- 2 Ayleid Casks 01
- 3 Ayleid Casks 02 (2 locked)
- 1 Chest 04
Traps:
- 2 Gas traps at locations T on map
Doors and Gates:
- There are two doors in/out of this zone
- 1 door (at C) leads to the zone Mackamentain
- 1 door (at E) leads to the zone Necromancer's Asylum
Other:
- 1 Stone Steps (rise to form steps when you step on the pressure plate, cyan dot) at location F on map
Zone 3: Necromancer's Asylum[edit]
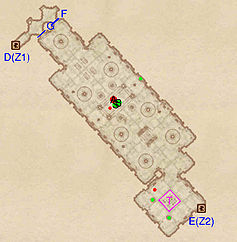
You enter from the second zone through door E, and return to the first zone through door D; door D is a shortcut that takes you back to a previously inaccessible region.
This zone basically consists of a small chamber linked to a huge, rectangular shaped one. The spike trap at the entrance can help you take care of the first enemy. Be careful not to miss the minor loot chests inside the columns.
The large chamber contains all five of this ruin's Welkynd stones. They are easily reclaimable from atop their pedestals between the entrance and the altar in the middle. On the altar is an Ayleid Statue and a Boss-level Ayleid Reliquary (B) guarded by the Necromancer Boss (A) and another enemy.
At the end of the room you will find two locked doors which provide access to the passage leading to door D.
Occupants:
- 1 boss-level Necromancer at location A on map
- 1 Zombie Undead
- 1 Zombie Undead (always best possible level)
Treasure:
- 1 Ayleid Statue at location S on map
- 1 boss-level Ayleid Reliquary (Necromancer variety) at B
- 2 Ayleid Casks 01 (1 locked)
- 1 Chest 01
- 5 Welkynd Stones
- 1 Sack with a potion - West of the boss chest in an alcove
Traps:
- 1 Spike Pit trap at location T on map
Doors and Gates:
- There are two doors in/out of this zone
- 1 door (at D) leads to the zone Mackamentain
- 1 door (at E) leads to the zone Tombs of the Undead
- 2 Gates at F and G (both locked)
